
Librem 14 Rave
Purism
Latest posts by Purism (see all)
- Purism Announces Launch of Its Librem 16 Laptop, the World’s Most Private and Secure Workstation - June 23, 2026
- Google’s Lock Down Policy - May 21, 2026
- Smartphone Study - May 21, 2026
Now that shipping of the Librem 14 to customers is imminent we should talk about some more details and enhancements we made.
Like we mentioned before the outside dimensions are almost the same as the Librem 13 was, so the Librem 14 measures: 322mm x 222mm x 17mm.
The total weight including the 4 cell battery, two SODIMMs and one M.2 SSD is about 1490gr (I am living in Germany, you have to get along with metric units 🙂 ).
A Walk Around
Let’s have a walk around.
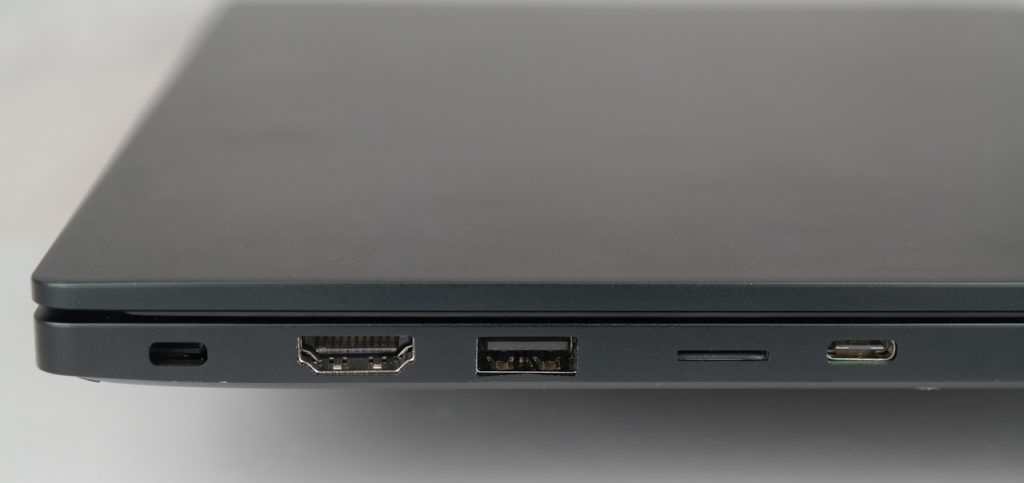
On the left hand side there are four connectors: HDMI, type-A USB3.1, microSD card reader (via USB3) and one type-C USB3.1. Also on the left side is a so-called “Kensington lock” hole for one of those laptop anti-theft locks.
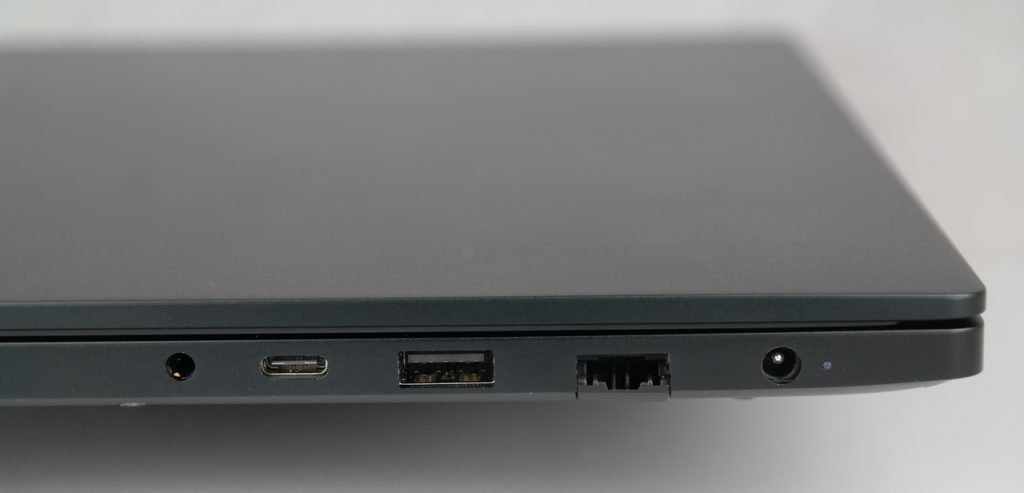
On the right hand side we have a 4mm barrel connector for 19V DC input (rated up to 120W), a gigabit Ethernet RJ45 jack with a neat flip down cover, another type-A USB3.1, a 3.5mm headphone jack and finally a full function type-C port.
Supporting Extra Screens
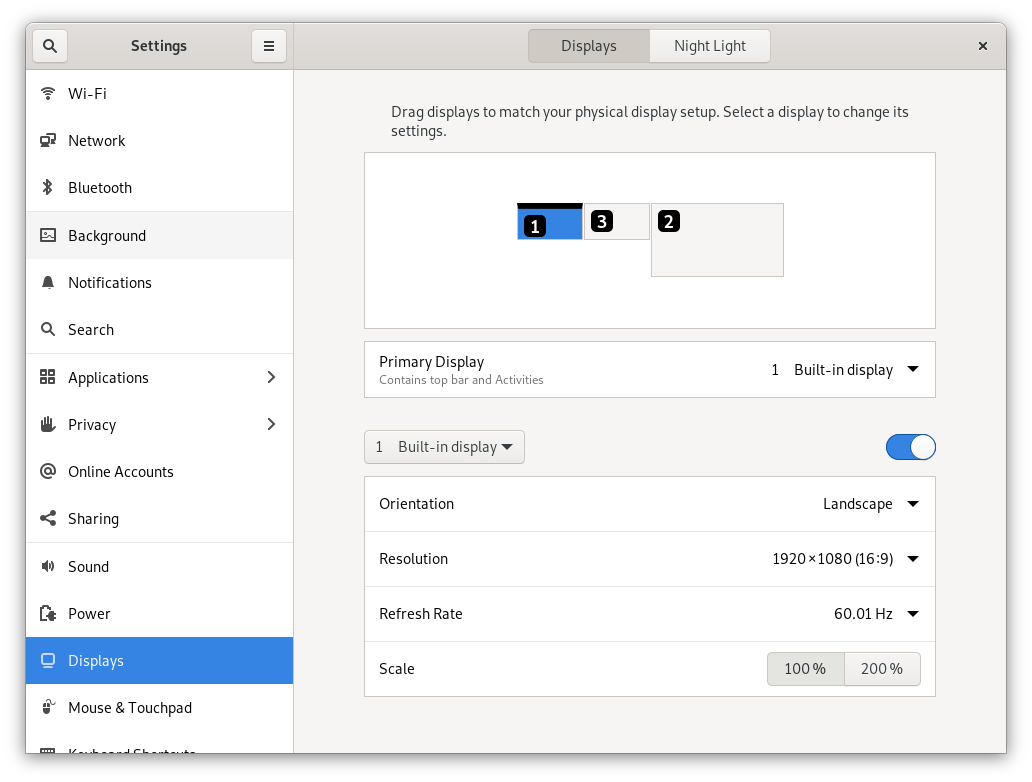
The full function type-C port is something new and that we are super happy about! This not only supports USB 3.1 data but also power delivery to charge the laptop and can also support the so-called type-C Display Port alt mode to attach to an external screen! So together with the HDMI 2.0 port we can now support three screens in total, the internal 14″ LCD, HDMI and type-C, all at the same time.
Another new feature of the Librem 14 is a power state LED next to the DC input barrel connector. We implemented this so that you can see the laptop’s power state even when the LCD lid is closed, e.g. when you put it in your backpack. This LED on the outside reflects the same states as the power LED on the inside next to the hardware kill switches (HKS). But before looking at these let’s first have a look inside.
A Look Inside
The bottom case plate can be removed after removing 9 screws holding it. The bottom plate (also called D-shell) is additionally held in place by a number of plastic frame snaps. These are actually an enhancement compared to the former Librem 13 and 15 since these help to hold the bottom plate in place and shape at all times. So after carefully clicking these out you get access to the guts.
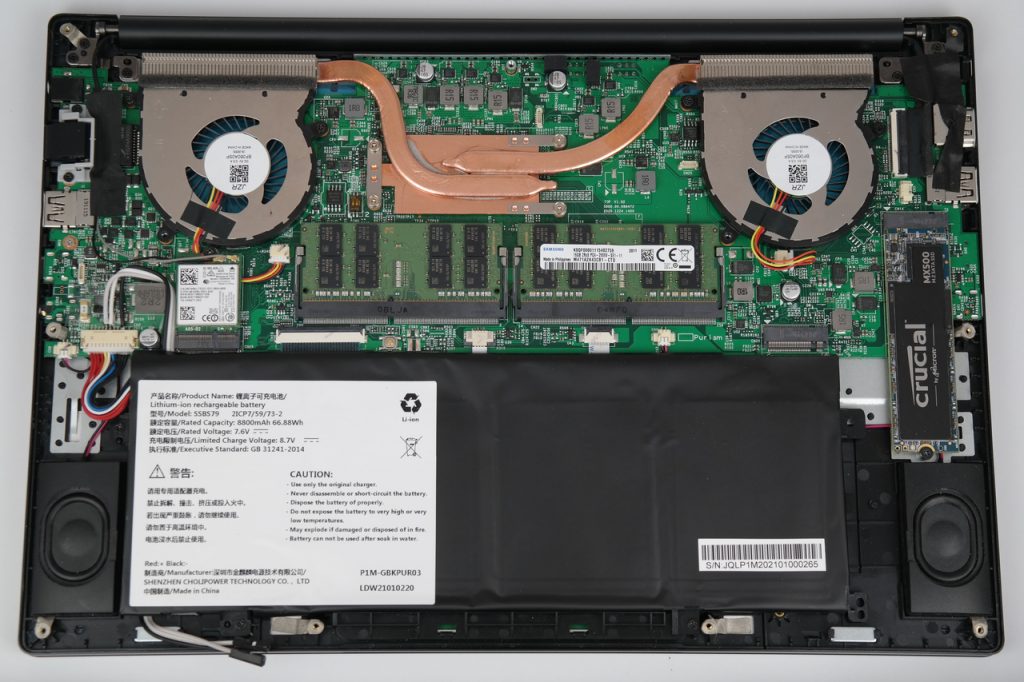
Towards the bottom sits the pretty large 4 cell battery with the speakers to the left and right. This covers pretty much the whole space underneath the hand rest. Above that sits the brand new Purism Librem 14 main board. Center piece is the Core i7 10710U CPU covered by the copper heat pipe leading to the two fans left and right. Between CPU and the battery are the two SODIMM slots – two for faster dual channel RAM access and up to 64GB memory! To the bottom right corner of the PCB you can see the two M.2 SSD slots — and here is the problem with the 4-cell battery, the second SSD slot is blocked by it, only one is usable. Once we get 3-cell batteries we can offer a choice, either 4-cell and one M.2 SSD or 3-cell and two M.2 SSDs. But right now there is only one M.2 SSD possible. And finally to the bottom left corner of the PCB there is the M.2 WiFi/BT card.
New M.2 Slot Features
The M.2 slot for WiFi/BT also has some new features–you will probably not need them but well, for the tinkerers and future compatibility we added them anyway! So, what’s new is that we have a couple of new interfaces connected on the M.2 socket. An UART from the chipset (PCH) is conected so you can use an M.2 card with serial UART interface. The PCM audio interface is connected to the I2S interface of the chipset, some Bluetooth cards use this for Bluetooth audio (SCO). And we have SDIO connected to the chipset so that you can use M.2 cards with an SDIO interface. So to summarize all interfaces that are now supported on the WiFi/BT M.2 socket: PCIe, USB, UART, SDIO, I2S/PCM [4].
BIOS and EC Chips
For those interested, the BIOS flash chip containing Coreboot/PureBoot is the small SOIC-8 chip located right of the left fan, the flash chip containing the Librem EC firmware is located beneath the M.2 WiFi/BT card. Right next to the BIOS chip you can also see two small DIP switches (circled in red):
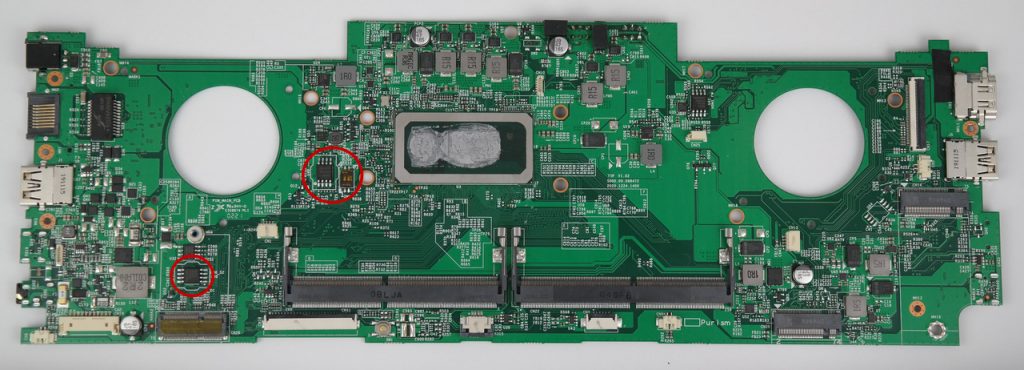
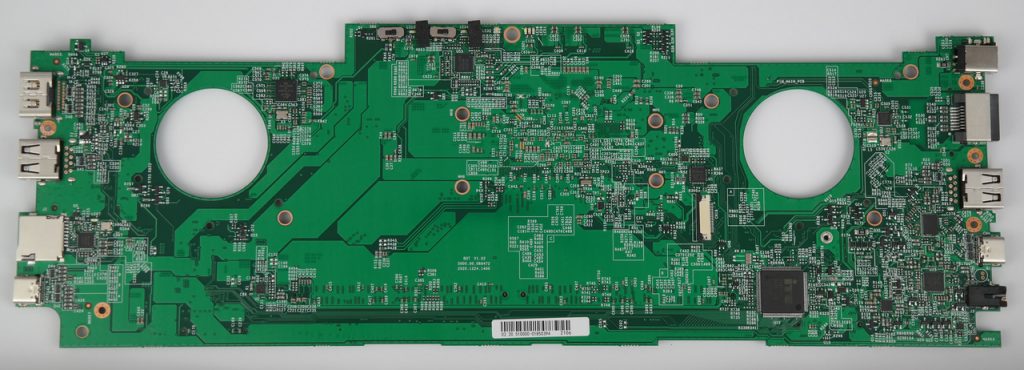
These are connected to the write protect pins of the BIOS and EC flash chips! With these you will be able to write protect the chips so that software can not write to them anymore. We still need to add software support for write protect so this is still work in progress. But the hardware is there! And for completeness, here is also the quite boring bottom side of the PCB:
Opening the Lid
Now let’s open up the LCD lid:
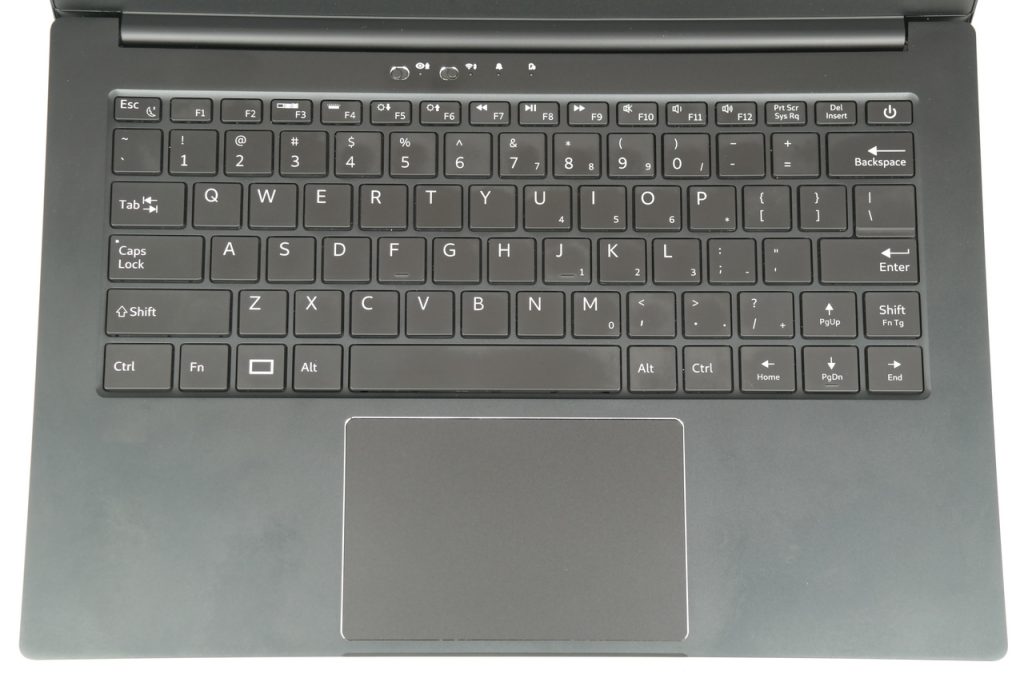
Let’s go from bottom to top. First of all there is the large multi-touch touchpad, perfect for all kinds of tasks. Above that is the custom Purism keyboard with Purism key and a customized key layout, especially as it relates to special keys. Instead of cramming in tiny keys for page-up/-down, home and end we went for an approach using the Fn key, so Fn-Up serves as page-up etc. In the top row are the usual multi media keys (F7 rev, F8 play/pause, F9 fwd, F10 mute, F11 vol-, F12 vol+) along with the LCD brightness F6 down and F7 up. The keyboard backlight can be toggled with Fn-F4. And here we have a novelty for the Purism laptops, this can not just be toggle on or off! We now can support multiple brightness levels, right now we have implemented four so that you can tune it to your liking and / or ambient condition.
Hardware Kill Switches
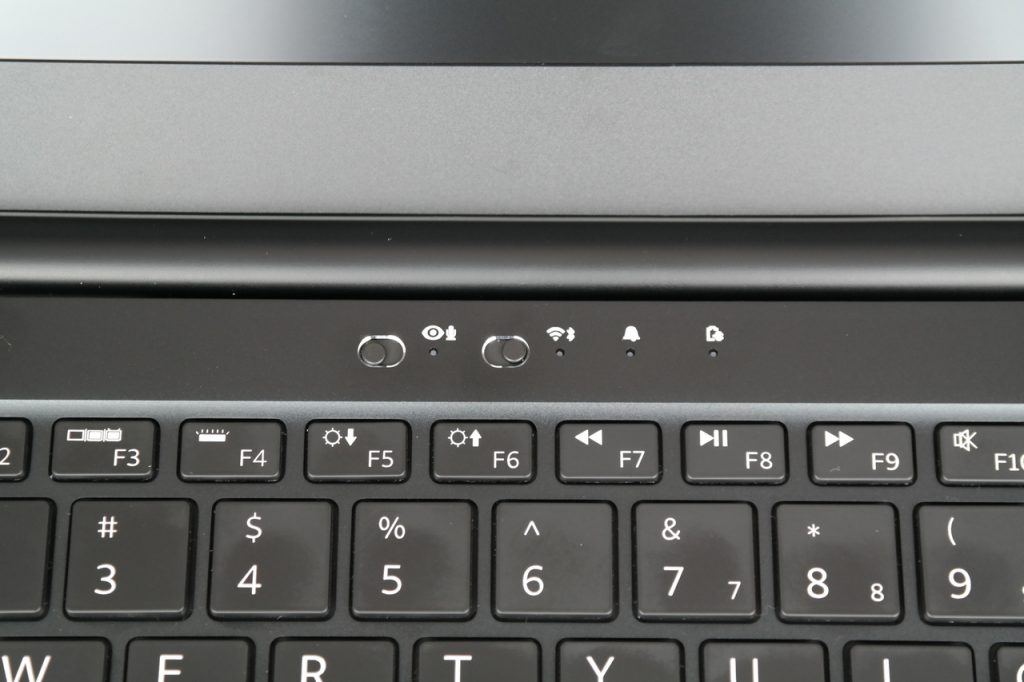
Towards the top we have the Purism signature hardware kill switches, now with a nice silver chamfer around them. We placed the HKS on the keyboard side (instead of the side as in Librem 13 / Librem 15) to better protect the switch levers. Next to the HKS we now have two LEDs to also visually signal the state of the devices. And here I need to elaborate a bit more, because there is more to it than meets the eye.
So first of all the working of the kill switches changed a bit. The camera / microphone kill switch still severs power to the integrated web cam. But since we now have integrated digital microphones which provide much better audio quality the kill switch now also severs the power supply to the digital microphones. The 3.5mm headphone jack also supports headsets with microphones[1] and the kill switch will also cut off this.
The more interesting change is for the WiFi/BT kill switch. With the L13/L15 we used the DISABLE signals on the M.2 slot to hardware disable the WiFi/BT M.2 For this to work you have to rely on the card inserted to honor these signals. With the Atheros card we ship we are sure this is happening, but we can not guarantee this for other cards. So we changed that approach and we now cut power to the M.2 slot altogether! This will result in the USB BT device being “unplugged” and the PCIe WiFi device dropping from the PCIe bus, only to get hot plug added back again when being re-enabled again. So the big change here is that we do not rely on the M.2 module honoring the DISABLE signal but we cut power to it, so there is no way that it can get re-enabled by anything, except by your finger flipping the switch!
Controlling the WiFi LED
Next to the HKS we now have LEDs signaling their state. The LED next to the camera / microphone HKS will be on when camera and microphone are enabled and off otherwise. It is pretty much hardwired to the power supply of the camera and microphones. The LED next to the WiFi/BT LED is a bit different. This one is not only hardwired to the switch state but when the switch is on it can also be controlled by the EC. In default mode it will be on when WiFi/BT is enabled (powered) and off otherwise. With the ACPI driver [2] that we adapted for the EC [3] this LED can now also be controlled by software! It becomes a regular Linux LED:
/sys/class/leds/librem_ec\:airplane
Note: Before you start to freak about the following commandline shell examples, there will be reasonable defaults, you do not have to do anything unless you want to take over control and customize your hardware’s behavior to your wishes.
Like all Linux LEDs the LED can be assigned to a so called trigger, i.e. a Linux kernel driver that can automatically change the state of the LED based on certain events. By default the Librem EC ACPI driver will assign the “rfkill” trigger to the LED, which means that if the radio is switched off from Linux using the rfkill framework (e.g. by disabling it from the graphical user interface) the LED will also turn off! But there are more cool things you can do here, there are more triggers.
One trigger I personally like a lot is the ‘netdev’ trigger. With this trigger you can configure a network interface to monitor and if the RX or TX (or both) queue are triggering a ‘blink’ of the LED. A simple script like this:
modprobe ledtrig-netdev
echo netdev > /sys/class/leds/librem_ec\:airplane/trigger
echo wls6 > /sys/class/leds/librem_ec\:airplane/device_name
echo 1 > /sys/class/leds/librem_ec\:airplane/rx
echo 1 > /sys/class/leds/librem_ec\:airplane/tx
will let your WiFi/BT LED next to the WiFi/BT HKS blink whenever there is traffic on the WiFi interface. I like this a lot since it gives me an idea if I am still connected, data is still flowing and it also gives an idea about how much data. Cool, isn’t it? But you can also use it for all the other triggers that the kernel offers or control it by your very own program or script, just by writing 0 or 1 to:
/sys/class/leds/librem_ec\:airplane/brightness
Controlling the Notification LED
If you think this is fun and cool, wait for what we have next, the notification LED! It is located literally right next to the WiFi/BT LED. I talked about it a bit in our post about the EC firmware development, now it is real and working. The notification LED is in fact a triple LED with red, green and blue (RGB). Each color can be controlled individually in 255 brightness steps – not just 0 or 1. So theoretically you have 255*255*255 colors to choose from! In practice there are fewer colors since not all LEDs have a visible brightness at low levels. In particular blue is comparably dark so the color yield is a bit less. But this is pretty normal for RGB LEDs and is also rooted in the perceived brightness through the human eye, among other things. To give you an idea: to get something pretty close to a neutral white you need to set red:90, blue:200 and green:255. The three colors can be accessed through the LED interface in the sys filesystem:
/sys/class/leds/red\:status
/sys/class/leds/green\:status
/sys/class/leds/blue\:status
and brightness can vary from 0 to 255, so
echo 255 > /sys/class/leds/red\:status/brightness
will turn on the red LED to full brightness. The idea behind the notification LED is the same as what mobile phones, like the Librem 5, have: an LED to signal something while the display is off or something else is occupying the display, so that the user can see that something tries to get her or his attention. We have implemented this for the Librem 5 already and this will then also work on the Librem 14! Or you can choose to use the LEDs in other creative ways! Since access is super easy by shell script or simple program, I am sure we will see a lot of creative uses for them.
Also the notification LED colors can of course be used with triggers, with all the triggers the kernel offers, e.g. what about a nice red heartbeat, getting faster with CPU load:
modprobe ledtrig-heartbeat
echo heartbeat > /sys/class/leds/red\:status/trigger
Or the green LED in such a cool glow dimming pattern:
modprobe ledtrig-pattern
echo pattern > /sys/class/leds/green\:status/trigger
echo 0 1000 255 1000 > /sys/class/leds/green\:status/pattern
So cool!
Controlling the Keyboard Backlight
And there are more things you can control from user space the very same way, like the keyboard backlight:
/sys/class/leds/librem_ec\:kbd_backlight/brightness
You can write the actual brightness into that virtual file and the keyboard backlight will change. Since this interface is a common interface in Linux, user interfaces like GNOME pick them up, i.e. you get feedback on the screen when the keyboard backlight is toggled by the hotkey (Fn+F4) and the keyboard backlight will get switched off when the screen saver kicks in and switches off the LCD! Very nice. And GNOME remembers the backlight brightness between reboots too.
Controlling the Battery
In our last blog post we also talked about the battery charge controller and that we can set some threshold from user space. Here you go:
/sys/class/power_supply/BAT0/charge_control_start_threshold
/sys/class/power_supply/BAT0/charge_control_end_threshold
If the battery percentage falls below the start threshold and then a new charge is started, charging will stop when the battery reaches the end threshold percentage. On my Librem 14 I currently use a script and set this to:
# set default battery thresholds
echo 40 > /sys/class/power_supply/BAT0/charge_control_start_threshold
echo 95 > /sys/class/power_supply/BAT0/charge_control_end_threshold
The system fans can not be controlled from user space yet, right now, but they can at least be monitored a bit:
/sys/class/hwmon/hwmon4
We will work further on it.
The ACPI driver is on its way into PureOS as a DKMS package and we will do our best to get this into upstream Linux kernel so the DKMS will not be necessary mid-term.
Battery Life
Now with the final product in hand we can also answer another FAQ: What is the battery life? Well, of course this always depends on a lot of factors, like display brightness, if programs keep the CPU or GPU busy etc. etc. So it is pretty hard to give definitive answer to that question. But I think I can provide you with at least two data points that should give you a good idea.
With about 60% LCD brightness, WiFi connected and otherwise pretty much idle I get an estimated (!) battery life of more than 10 hours! Does this sound vague? Just an estimate? Well, yes, it always will be, your mileage will vary a lot actually depending on your use case. But I can add a second data point. I usually switch off the power strip on my desk when I leave my office–just to be sure, no rogue electronics, no unexpected “surprises” in the morning, an engineer’s desk can be a mess (and mine for sure is) so better be safe than sorry. So one night I did just that, but totally forgot that my development Librem 14 was booted up sitting there, LCD off, Ethernet connected and mostly idle. I recognized my negligence the next morning when I returned and to my surprise it was still alive! It sat there patiently all night for over 15 hours and still had 20% juice! So these approximate 10h battery time with LCD and light load seem pretty realistic to me and I am super happy about that!
Closing…
Bringing the Librem 14 to life and into your hands has been quite an adventure! And a long one too… much longer than we planned for and wanted. First Covid crushed all plans, then a CPU shortage which delayed the main board verification, general silicon shortage making sourcing parts a pain and finally issues in sourcing decent LCDs. And to top it all off this is the most customized laptop we ever built with a lot of Purism special features. Doing something the first time always has a certain risk to it, will it work out as expected?
After all these months of hard work it is with incredible joy to see all these tiles falling into place, the product taking shape and all we have planned and dreamed of becoming a reality!
And let me add in closing a brief personal anecdote. My first contact with Purism was in 2016. I was taking part at GUADEC, held in Germany that year. At that time I was, yet again, hacking on some laptop I bought some weeks before and trying to make it work as well as possible with Linux. It was so annoying having to work around tiny paper cuts in the proprietary BIOS and embedded controller which prevented some really basic things, like proper battery readings. This was not the first time I went through that pain, it was a usual thing for me every time I had to get myself a new laptop. They usually, mostly worked well but every time there were these paper cuts here and there. It was super frustrating because usually these things are trivial fixes, if you would just have access to the BIOS source code, or the EC or … you name it. I was fed up with this proprietary stuff.
And there came Purism, fighting for opening up that stuff and creating consumer devices as open and as free as they possibly can be. I had to get in touch with them!
So here we are, about five years later and I am so proud to be part of this Purism team, just having finished yet another product that heals many of these paper cut wounds. The Librem 14 offers pretty much everything that I wanted back then and I can not really describe the feeling I have right now. All these things I ever wanted to have in such a machine but never could. Now we are here. So awesome!
I very much hope you will like it as much as I do!
[1] Headset microphone and headset plug-in detection is not yet working. The wiring is there but there is still work that needs to be done on the software side with the codec.
[2] https://source.puri.sm/nicole.faerber/librem-ec-acpi-dkms
[3] https://source.puri.sm/coreboot/librem-ec
[4] Some of these may need additional software to work.
Recent Posts
Related Content
- Privacy Under Siege: Why Purism’s User Sovereignty Model is the Way Forward
- Code is Power!
- Dialing Back to Move Forward: Why the Landline Revival Signals a Future for Privacy
- Google’s New Sideloading Restrictions: Why Purism Thinks Differently
- Introducing the Librem PQC Comms Server

