
Preventing AMI’s BIOS from interfering with coreboot flashing on the Librem 13
Purism
Latest posts by Purism (see all)
- Purism Announces Launch of Its Librem 16 Laptop, the World’s Most Private and Secure Workstation - June 23, 2026
- Google’s Lock Down Policy - May 21, 2026
- Smartphone Study - May 21, 2026
I wrote recently about one of our collaborators having tried to install coreboot and unfortunately bricking his laptop in the process. I sent him mine as a replacement, then he swapped hard drives and he sent me his testing unit, so that I could investigate what happened. This is what we found.
Once I received his laptop, I obviously wanted to dump its flash to see what went wrong, but it was… not cooperating. My external programmer setup was working fine with my previous laptop, but now it was somehow completely unable to detect the ROM chip. I set out to figure out why, I tried everything: I used my logic analyzer to see if the SPI data had the right values, I tried a different power supply, a different FTDI chip, different USB cables, anything I could think of… and it made no sense whatsoever. Sometimes it would show me the right data in the logic analyzer, but the FTDI would not see the same data; most of the times though, it looked as if the MISO pin was being pulled high, so I even tried to wire a resistor to ground in order to pull down on the MISO pin, without luck.
Then, after four hours of intense troubleshooting, it suddenly worked, without warning. What had I done to make it work? I had no idea at first on what I did, but I remembered this as being my last sequence of events before it had worked :
- I had a suspicion of a defective FTDI chip and was using my backup chip (which was also not working up until now);
- I had powered down the ATX power supply providing 3.3V to the motherboard
- I used the laptop’s power supply to turn on the laptop and try to read the chip while it was on (knowing quite well that it wouldn’t work since the motherboard itself would be driving the SPI chip’s pins high/low, thus interfering with the FTDI chip);
- I shut down the laptop, removed the charging cable and put the external power supply on again
- I tried to dump the flash, and that’s when it worked!
I had done similar manipulations hundreds of times already, and whenever I connected the flasher to the ROM (battery removed of course and external ATX power supply on), the flasher couldn’t detect the chip. Quite annoying.
Then I found a way to trick the hardware. While the FTDI chip is connected to the SPI flash, if I insert the charging cable into the laptop for about 2 seconds (and quickly remove it) then turn the power supply back on… suddenly the FTDI can detect and read/write to the flash chip without problems. Without a doubt this makes no sense at all (the joys of hardware), but it is 100% reproducible, so when I discovered that trick I simply thanked the lords of Kobol for their offering and I dumped the flash, then unbricked the laptop. Oh, and yes, my original FTDI chip had become defective, so switching to the backup one was also a required step.
Encounters with chimeras

Inspecting the flash dump, I was in for a surprise: the coreboot image was corrupted in a strange way, it had parts of the old AMI BIOS in the middle of the coreboot BIOS. Essentially, a chimera.
Let’s study this strange creature.
- The old factory BIOS started at offset 0x200000 in the ROM (the first 2MB of the ROM are reserved for the ME)
- After coreboot was flashed, the old factory BIOS had apparently “moved” and was now in the ROM at offset 0x220000…
- Unfortunately, coreboot was already at offset 0x200000, so 128KB (0x20000 bytes) into the coreboot image’s region, the old BIOS had somehow inserted itself there and was corrupting our coreboot image.
I was completely baffled by that discovery. How could it have happened? The only thing I knew was that our collaborator had flashed coreboot from within Qubes OS, so I installed Qubes OS, spent some time learning how to use it, figured out how to install flashrom into “dom0”, how to move my coreboot image into dom0 and how to flash it. I rebooted and… it was working fine. So the problem wasn’t QubesOS, which brought me back to square one. I shelved the problem at that time and moved on to writing my coreboot installation script instead.
After my coreboot installation script was done, it was time to beta-test it (beyond just testing it myself). François Téchéné from our team volunteered to try it on his Librem 13. To be sure, I hopped on a conference call with him for this operation. Everything was going well, and after he powered off his laptop… it was a brick too. Curses!
Well, we’re back to the chimera then. Now we have seen two chimeras, so we know they’re real. Why was it working for me (I tested at least 100 times during development of the script) and Todd but not for some others? I tried the script again on my machine, powered off the laptop, and then got a brick too. I retried multiple times and kept getting the same corrupted coreboot image with the displaced old BIOS written in the middle of it. This was making less and less sense, and making me more and more tense. What was wrong with my alchemy?!
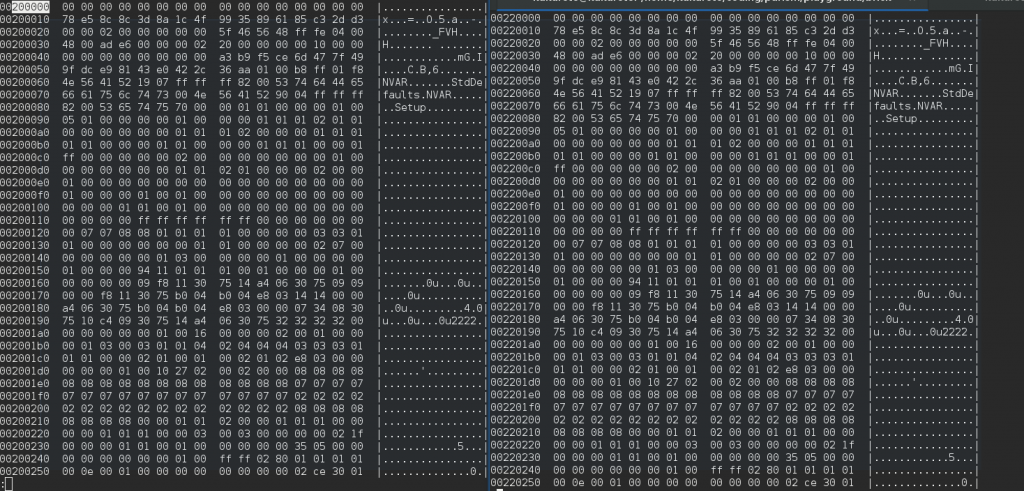
My script was already testing that flashrom was writing the ROM properly (by reading it back and ensuring it would get the exact same hash), but in this case after turning off the computer, I would get a different reading (the corrupt image) when reading with an external flash programmer. Below are some comparisons (left vs right) where you can see, on the left, the original BIOS image, and on the right, the chimera :
You see how the images match but the offsets are different (from 0x200000 to 0x220000) :
And this is the end of the changes, where you can see that the data is not entirely the same (the top part, also some of the lower part is mangled), and the data is matching from 0x21FFFF in the original BIOS with the 0x23FFFF in the chimera) :

I wondered if there was a bug in flashrom or in the internal SPI programmer that would cause this corruption. Maybe it was writing incorrectly but somehow caching the data so that when we read it back (and when flashrom itself verifies the data after it wrote it) it would give us the data we asked to write but not the one that was actually written?
Finding the alkahest
As I asked around on IRC in the #flashrom channel, agaran (IRC nickname) came to the rescue and after analyzing the binary files and the diffs (images above), he noticed that the “old BIOS” data looked more like some “NVRAM Storage” instead of being actual BIOS code. He suggested that maybe something was writing that data when I was powering off the laptop.
 At that moment, I had an epiphany: all these last few months, I was almost always rebooting (or suspending) the machine after flashing coreboot, and when I was actually powering it off, it was quite probably always when I was testing a new coreboot version on a laptop that already had a previous version of our coreboot image! When I was in the conference call with François, he said, “I’ll power off the laptop”, which somehow stuck in my mind so when testing on my own later that day I was now subconciously using the “poweroff” command instead of the “reboot” command, which made all the difference!
I then spent a couple of days testing: I flashed the original factory BIOS, powered off, then flashed coreboot, then powered off again (or suspended, or rebooted, depending on the test case), probably 20 times for each scenario (every poweroff required flashing using the external hardware flasher, which required the charging cable trick to make it detect the rom). I was then able to confirm that:
- Whenever we use “poweroff”, or even using “echo o > /proc/sysrq-trigger“, the flash was getting corrupted.
- If we “reboot”, “pm-suspend”, “halt”, do a force shutdown by holding the power button, or “echo b > /proc/sysrq-trigger“, the flash would not get corrupted and coreboot would be fine.
- No corruption happens if I power off when coreboot is running. This only happens if the currently-running BIOS is the factory AMI BIOS.
I had eventually connected my logic analyzer again, and realized that the corruption was happening after the Linux power off sequence, right after the screen backlight turns off and before the power LED turns off. I was happy to have written my previous script to analyze the logic trace and return a command execution log, which showed me that indeed, that’s what was running and rewriting my sectors.
The best explanation we have so far is that the factory BIOS has an SMM hook on the S5-state transition (shut down), which gets part of the old BIOS to execute, verify if the BIOS settings it has in memory are still matching the values in the ROM, if it doesn’t match, then it writes them back again. Because why not. And the reason the data is displaced by an offset of 128KB is probably because that same BIOS code will not find the NVRAM storage at its usual 0x200000 offset, so it decides to leave that area intact and instead just write it in the 0x220000 offset).
Turning lead into gold
In theory, the workaround is easy: reboot and do not power off after installing coreboot. However, as I’m writing an install script that should work for every Librem 13 users, and I want it to be as fool-proof as possible, I cannot allow that. Sure, I could have the script’s startup tell people that they need to reboot their machine at the end of the script and that it “can’t be postponed”, and then have the reboot done as part of the script itself, but what if someone prevents it from rebooting, and ends up shutting down their laptop instead? I’m sure there will be someone who does that, bricking up their laptop in the process, and we certainly don’t want that. So I started looking for an alternative solution to leave no margin for error.
There is no obvious way (that I could find) to disable that SMM hook, so I eventually decided to simply shift the coreboot image to a different region in the flash ROM, leaving that “AMI bios settings” area free. By doing so, we waste about 256KB of the 6MB BIOS region, but we are not that constrained for space and it’s a much better solution than risking a brick.
So now, I have a coreboot image that works in both situations; whether you power off or reboot your laptop, it will not get corrupted anymore, no matter what (but my script still does an automatic reboot at the end to make sure the old BIOS SMM hook doesn’t get executed, as an extra safety measure). What a great way to end the week!
— this epic tale was brought to you by Youness’ scientific rigor and Jeff’s homeric storytelling
Recent Posts
Related Content
- Code is Power!
- PureBoot Not Vulnerable to UEFI Exploits (Again)
- Intel AX200 Wi-Fi/Bluetooth Shipping for New Orders
- Librem 11 Memory Adventures
- PureBoot Framebuffer Boot Support

