
Demonstrating Tamper Detection with Heads
Purism
Latest posts by Purism (see all)
- Purism Announces Launch of Its Librem 16 Laptop, the World’s Most Private and Secure Workstation - June 23, 2026
- Google’s Lock Down Policy - May 21, 2026
- Smartphone Study - May 21, 2026
We are excited about the future of Heads on Librem laptops and the extra level of protection it can give customers. As a result we’ve both been writing about it a lot publicly and working on it a lot privately. What I’ve realized when I’ve talked to people about Heads and given demos, is that many people have never seen a tamper-evident boot process before. All of the concepts around tamper-evident boot are pretty abstract and it can be difficult to fully grasp how it protects you if you’ve never seen it work.
We have created a short demo that walks through a normal Heads boot process and demonstrates tamper detection. In the interest of keeping the demo short I only briefly described what was happening. In this post I will elaborate on what you are seeing in the video.
Step One: Normal Boot
The normal boot process for a computer that uses Heads is much like with any other computer, at least from a user experience standpoint. Like with other computers, you can bring up a full menu of different items to boot, but you can also pick one to set as your default. Once you set a boot option as a default, at boot time you can just press Enter and it will boot into your operating system just like with any other system.
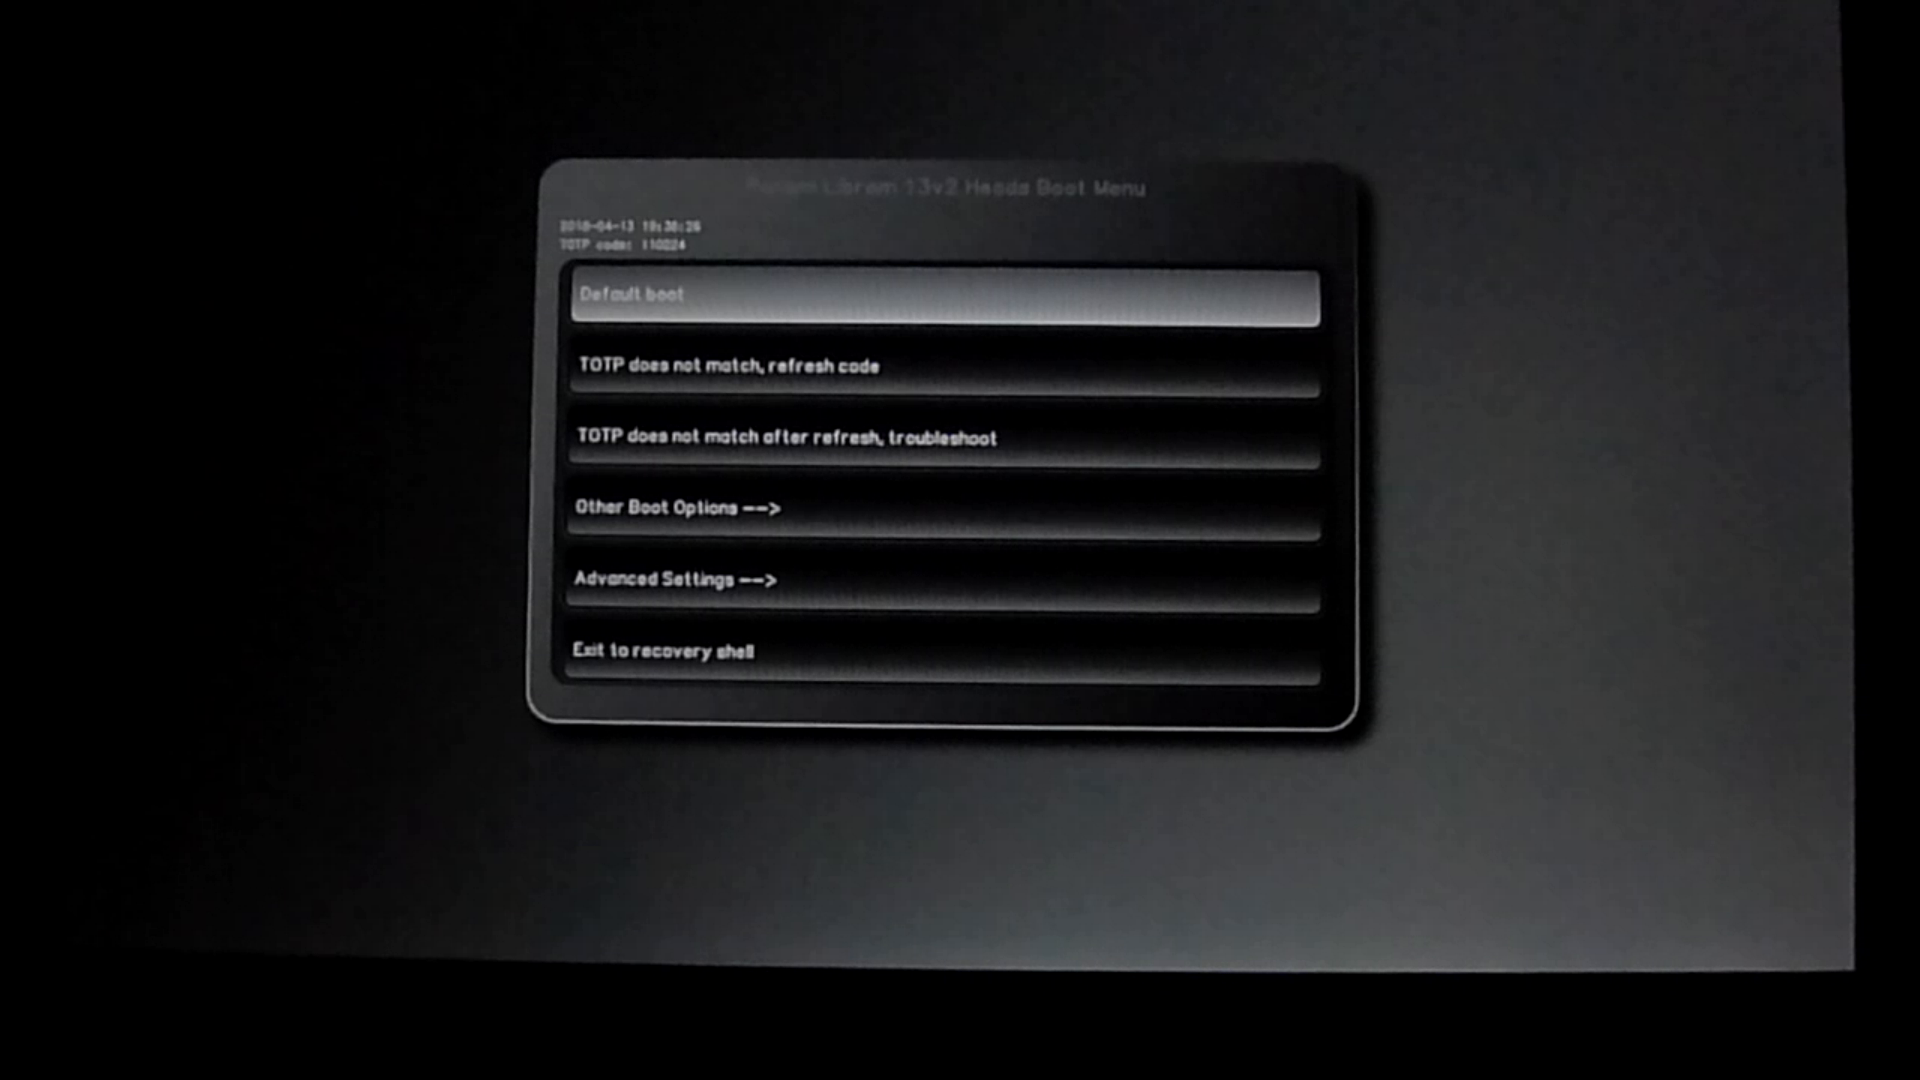
Unlike with other systems, Heads is providing extra levels of security during the boot process. At that default boot screen, you will see a 6-digit number above the menu options. That is a TOTP (Time-based One Time Password) code that Heads uses to prove to you that it hasn’t been tampered with and can be trusted. If you’ve ever used a TOTP code in the past, normally it’s so you can authenticate yourself to a website using Two-Factor Authentication. In this case it’s the reverse: the computer (specifically Heads) is authenticating itself to you! If that code matches the code on your phone, you know it’s safe to proceed.
Once you hit Enter during a normal boot, Heads then verifies the signatures of all of its configuration files stored in /boot based on the copy of your public GPG key it has within it. These configuration files include a file that contains sha256 checksums for the rest of the files in /boot. Once it verifies your signature for that file, Heads can trust it hasn’t been modified so it uses it to make sure the rest of the files in /boot haven’t changed. Since all of them match, they weren’t tampered with so Heads proceeds with the boot process.
Step Two: Hack The Computer
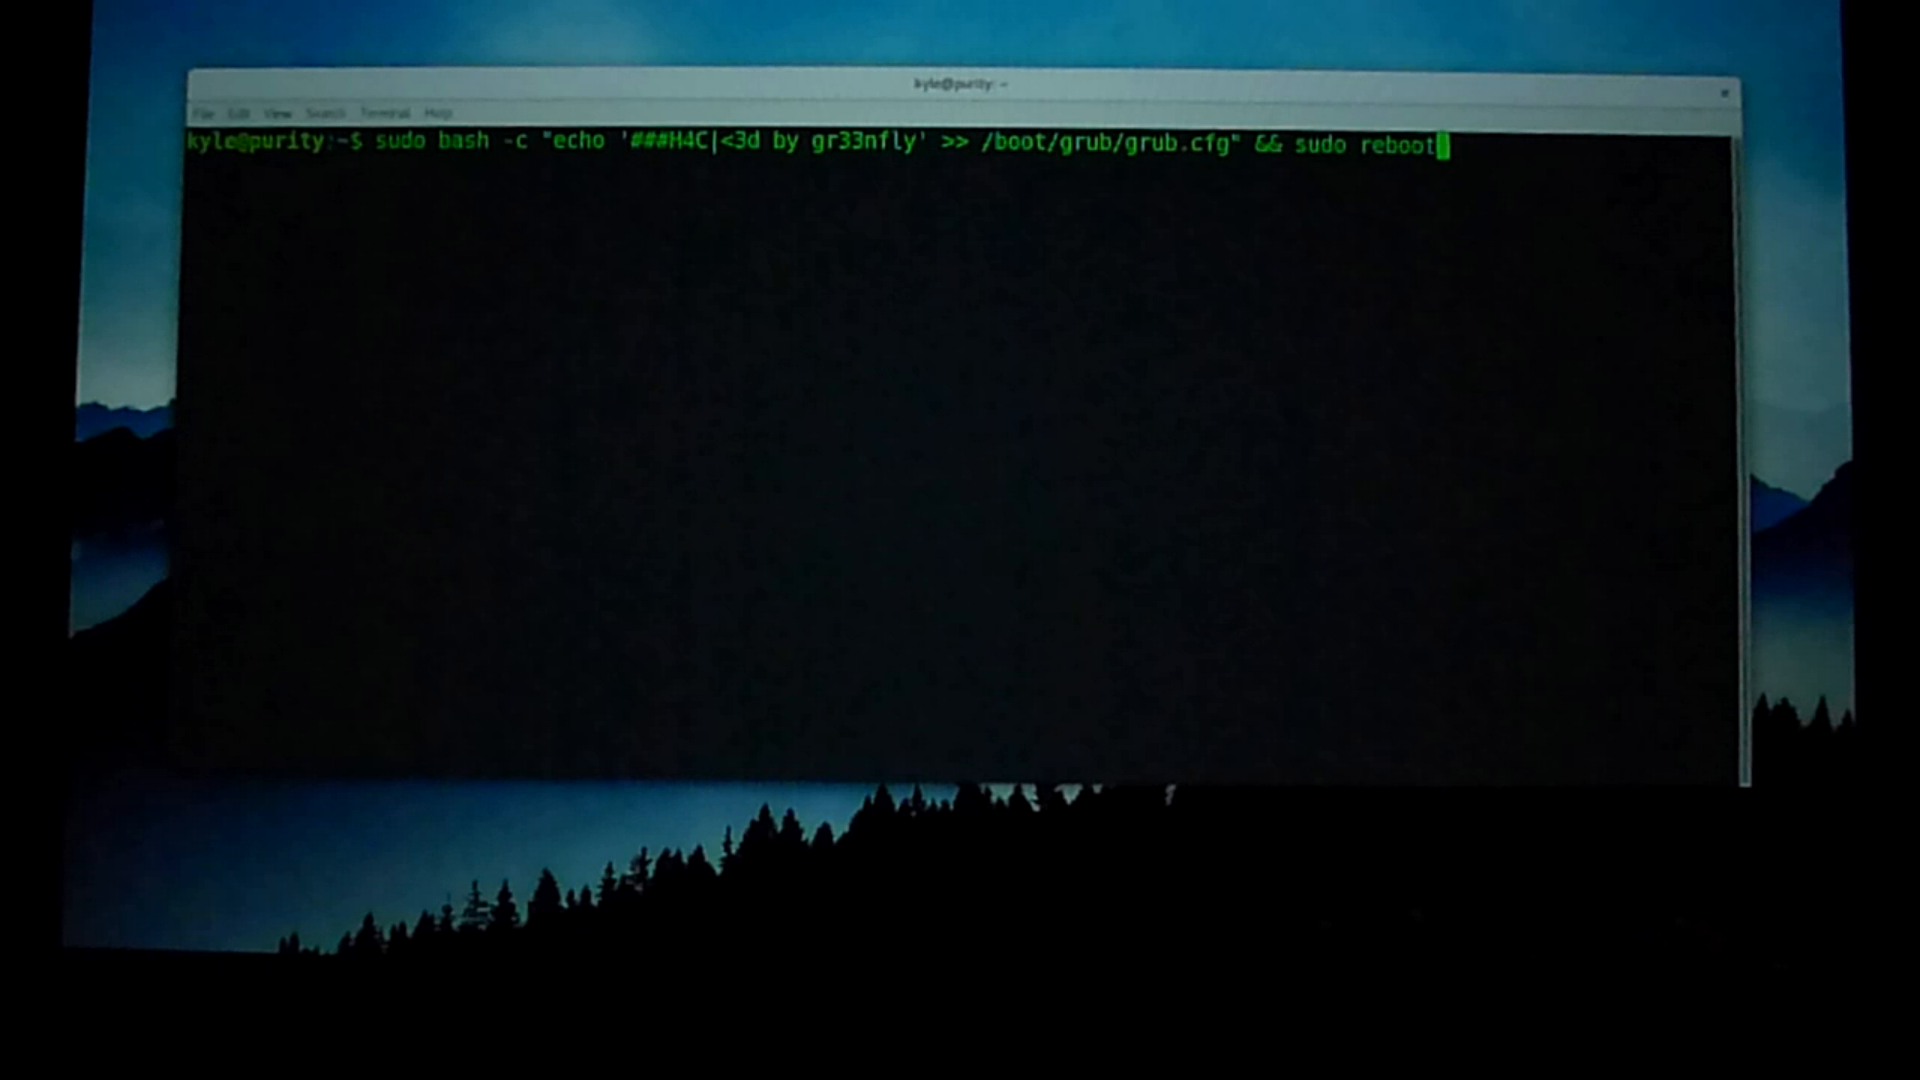
Once the computer boots, I put my black hat on and “hack” my computer by defacing my /boot/grub/grub.cfg file with a comment. This is a benign hack for demonstration purposes, but the attacker could have just as easily modified grub.cfg to boot from an older kernel on your system that has a known security vulnerability, added a single user mode, or otherwise altered the boot process to make it easier to launch another attack.
An attack that changes a plain text configuration file leaves a trail that might be easier for a user to detect if they happened to edit the file themselves. A more sophisticated hacker would put a back door into your default initrd file (the initial file system your kernel uses when it boots) or even replace your kernel with a compromised version. Both of these kinds of attacks are almost impossible to detect without a system like Heads. Because all of these files are stored in /boot, and Heads checks all of them, it is able to detect all of these types of tampering.
Step Three: Detect Tampering
When the system reboots, it returns back to the main Heads boot screen. First I hit Enter to select the default boot option but this time when Heads scans all of the files in /boot, it detects that grub.cfg has been changed! Along with the warning, I also get the option to re-sign all of the files in /boot. This option exists because there are a number of perfectly legitimate reasons why your grub.cfg, initrd, kernel, or other /boot files might change either because you edited them yourself or you updated software that changed them. Otherwise if you don’t want to re-sign files you can return to the main menu.
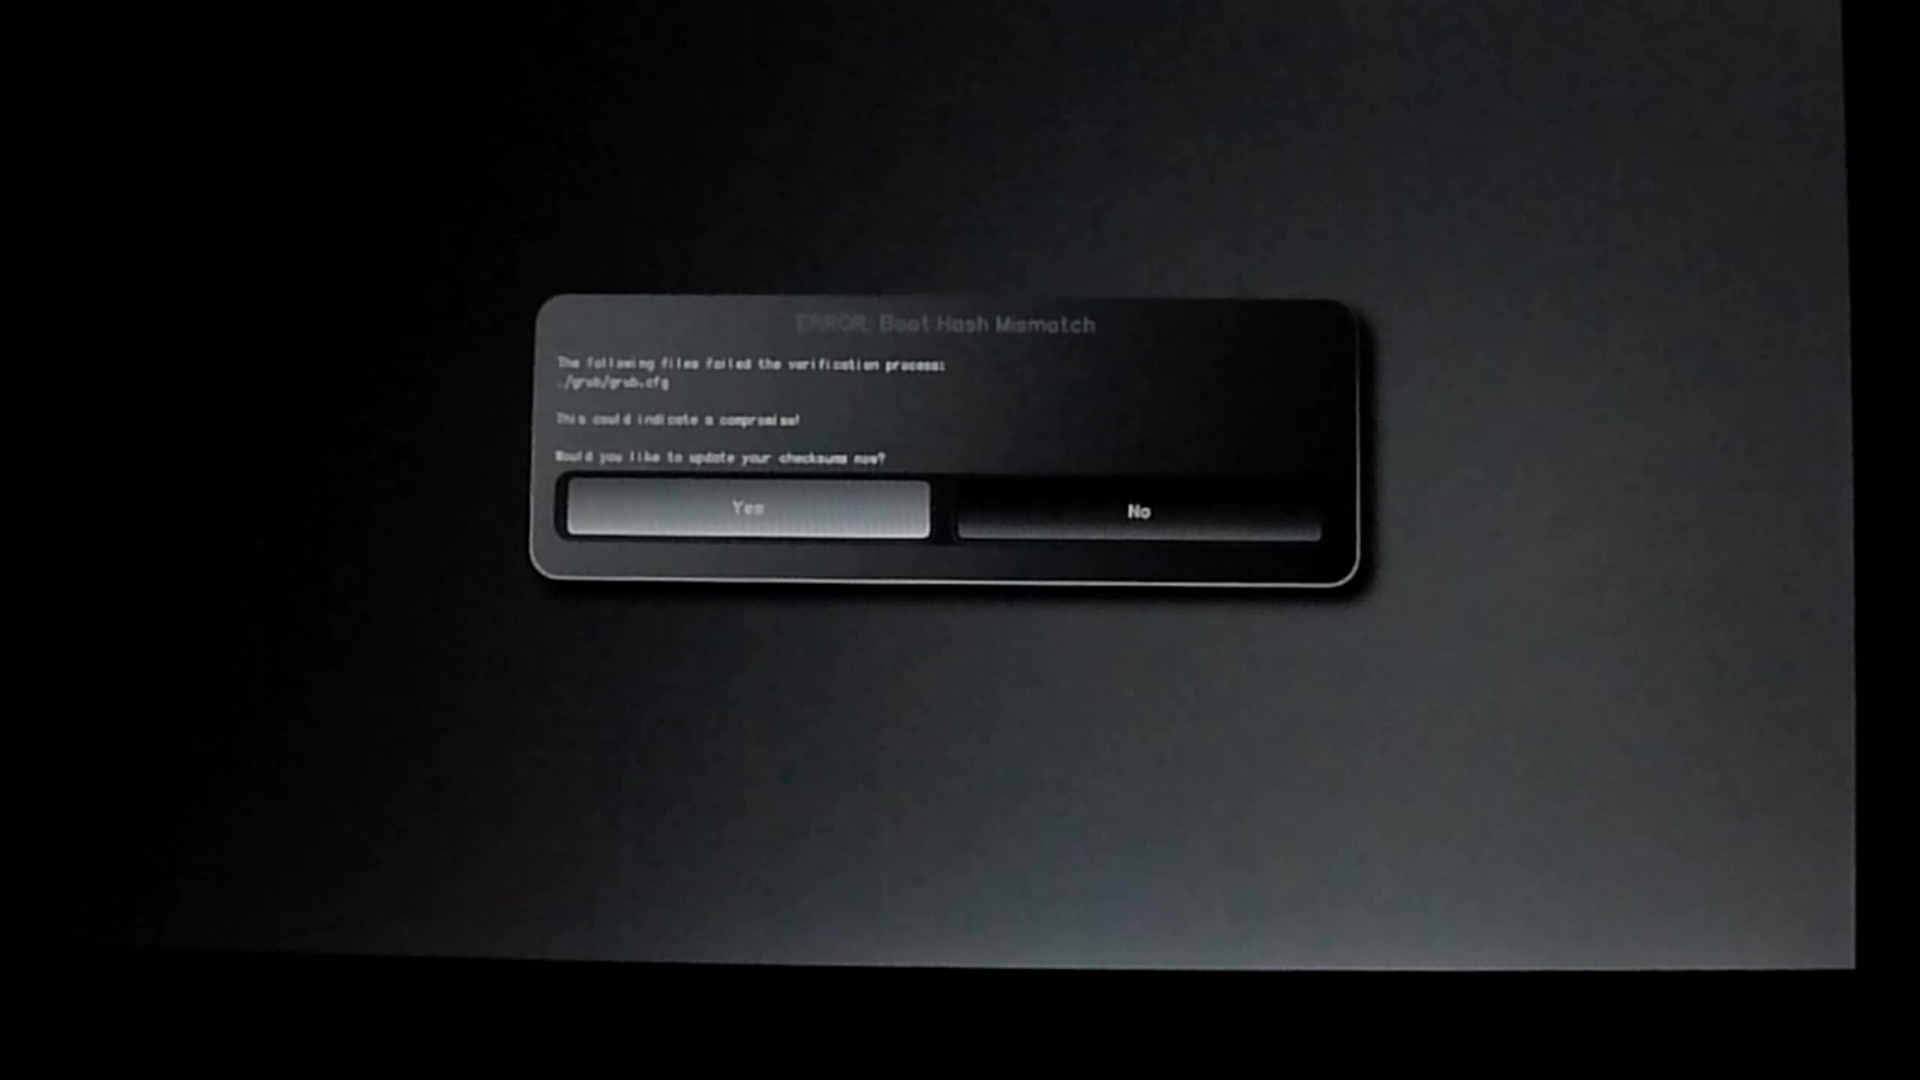
If you choose to re-sign all of the files, you will get an additional warning screen that explains what Heads is about to do and another chance to exit out to the main menu. If you did choose to re-sign all of the files you would then insert a USB GPG smart card that held your private keys so you could re-sign the Heads configuration files in /boot.
Since I knew that I didn’t want to keep that “hacked” grub.cfg file, instead of signing the files I returned to the main menu. By default Heads used to error out to a recovery shell if it detected a file was tampered with. The assumption is that the expert user could then investigate and remedy the problem from within that shell. If you aren’t an expert user in this situation you might not know how to recover and would end up being locked out of your computer!
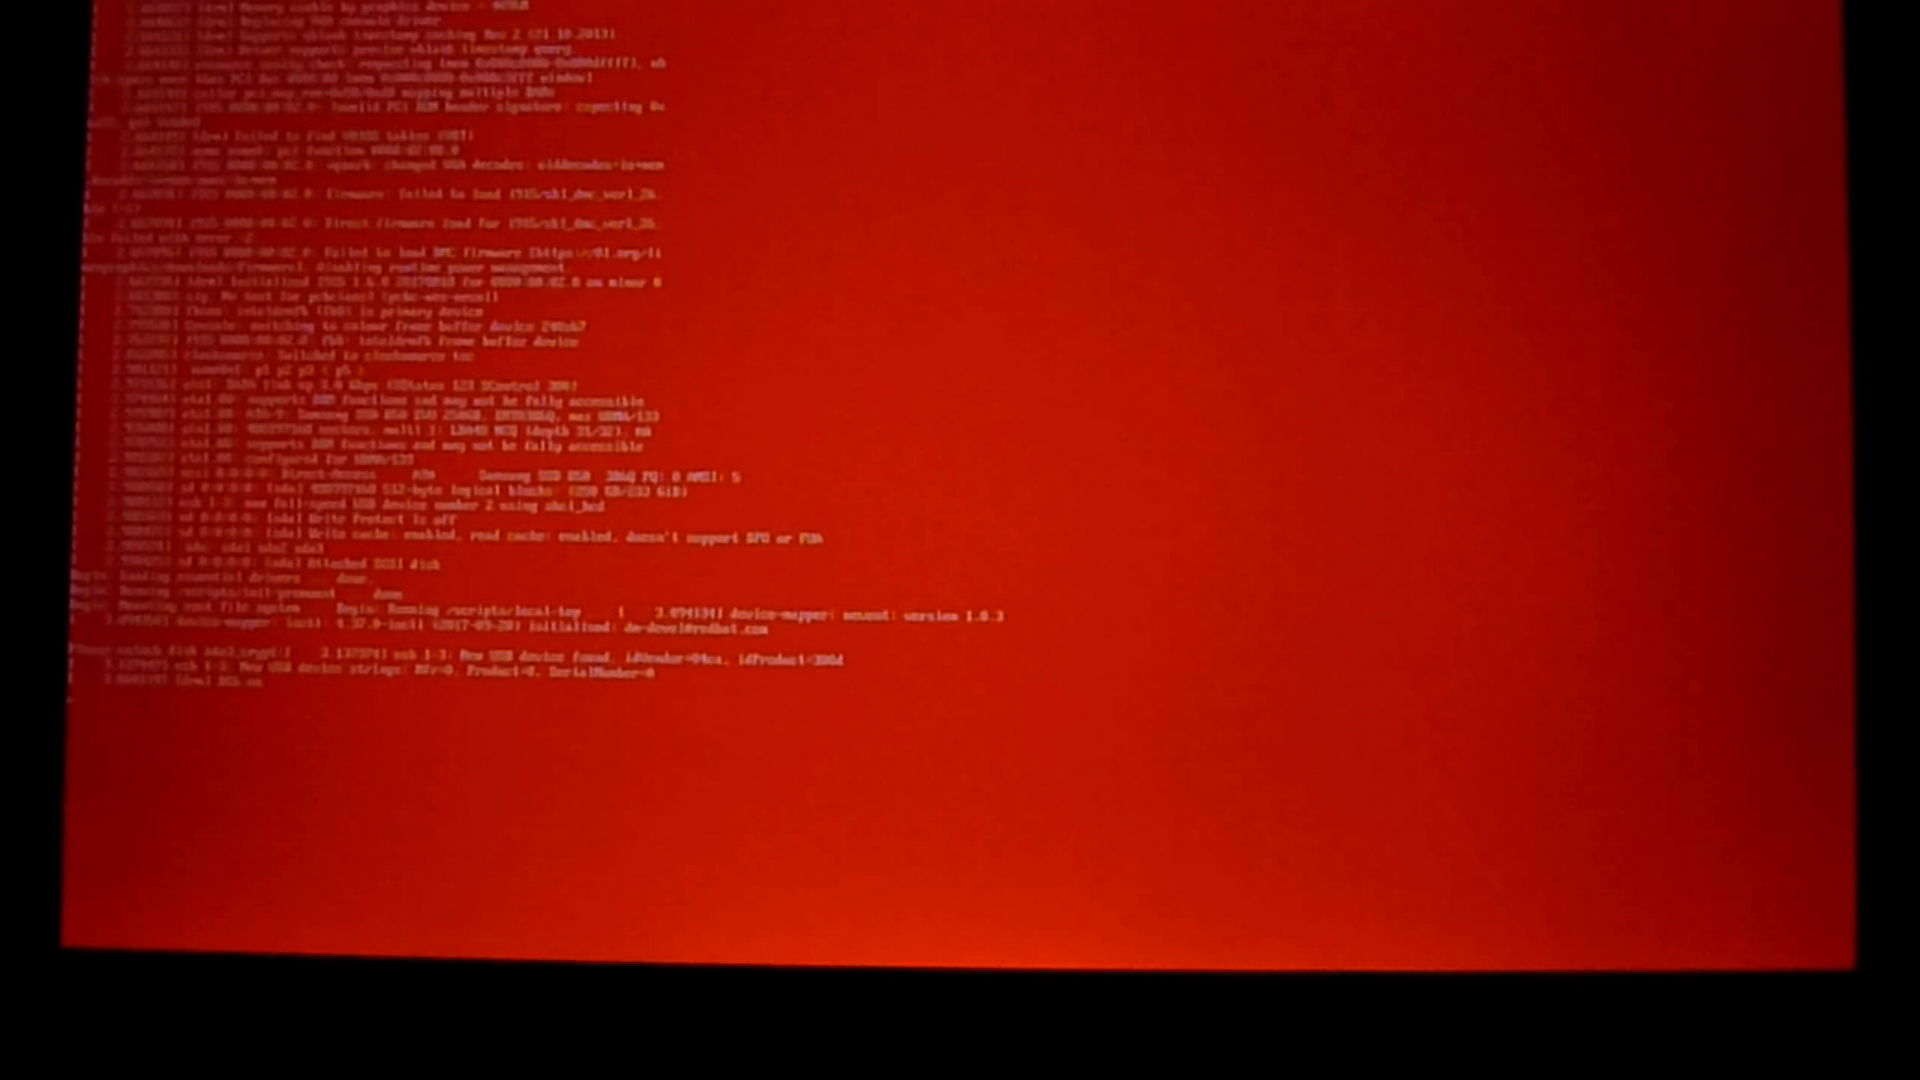
We understand that there are a number of situations where a user might legitimately or accidentally change files in /boot and while it’s not advisable to boot into a system that is actually tampered with by an attacker (because among other reasons, an attacker might be able to get your disk encryption or login passwords), we also don’t want to lock you out. We’ve added an “insecure boot mode” to Heads for these circumstances. When you select that option, Heads will ignore any tamper warnings and present you with a GRUB-style menu of boot options. You can then select a boot option and Heads will boot into your system. To make sure you know that this is an unsafe option, in addition to the warnings in the user interface, we also disable the splash screen and change the console to have a red background.
Step Four: (Optionally) Investigate Tampering
So what should you do if Heads alerts you to tampering? Exactly how you respond to a potentially legitimate tampering alert depends on a number of factors including what kind of user you are. I’ll step through three of the most common categories of Heads user and describe how they might respond to a legitimate tampering alert.
Category 1: Enterprise User
In the event of tampering, enterprise users would just hand the laptop over to their IT team and pick up a replacement while the IT team investigates. Some organizations might want to go a step further and work with us to customize their Heads image with branded and customized warning messages with their custom policies or direct the employee to an internal wiki or other resources. Some enterprises may even want to go even further and remove the ability to boot a machine that sets off tampering alerts. This would also be useful for employees who take their machine overseas to ensure the machine is in a safe state before they reconnect it to the corporate network.
Once the IT team receives the laptop, they can then inspect the laptop for tampering using their in-house tools and procedures, and then reflash the system back to their secure, internal image. For smaller organizations who may not have those capabilities, Purism also provides support services to bring the laptop back to a clean factory state.
Category 2: Expert-level End User
The expert level user will likely want to inspect the system themselves in the event of a legitimate tamper alert. While I demonstrate the insecure forced boot mode in the demo, the expert user would likely use the Heads recovery shell or boot into a USB recovery disk instead (like the PureOS live install disk) to investigate from there. Otherwise, when they boot their compromised system, they will be prompted for their disk decryption passphrase and login password and risk turning those secrets over to the attacker.
While the Heads recovery shell is limited to a small subset of Linux command-line tools, it has enough tools for the expert user to inspect files in /boot including a text editor to inspect grub.cfg and tools to mount the encrypted root file system from a trusted environment. Provided you trust Heads itself hasn’t been tampered with, you could inspect quite a bit just from this recovery shell alone.
If the Heads recovery shell didn’t provide enough tools, the expert user could also boot from a USB disk, mount the /boot partition and inspect the changed files. In the case of a modified grub.cfg they would just use a text editor for this. In the case of a modified initrd they would need to extract the file and inspect the extracted file system. From there they could also decide to mount the root file system and inspect it for rootkits as well. For users who may suspect Heads itself was tampered with, they would be able to use flashrom to pull down a copy of the version of Heads on the system and inspect it directly.
Category 3: Everyone Else
The average user is unlikely to put on their forensics hat and inspect a compromised system. While for the most part any alerts an average user will see will likely be a direct result of package updates or other changes they know they made, there’s a possibility that sometimes they might get an alert they weren’t expecting. For instance, if you took your laptop overseas on a trip and didn’t update it or otherwise change it during the trip, a tampering alert when you got home would be much more suspicious.
So what’s the average user to do? No matter what, you can always fall back to the insecure boot mode so you won’t lose access to their system or files. In that case even if you couldn’t inspect or fix the errors yourself, you could at least backup your personal files and reinstall the OS to get back to a safe state. Alternatively like with enterprise users you could also take advantage of Purism support services to reflash your system to a factory state.
Conclusion
Hopefully watching Heads in action has helped make it a bit more clear just how it will protect you from tampering. In future posts I will walk through other Heads features and workflows including registering a new TOTP code and completely resetting the TPM.
Recent Posts
Related Content
- Privacy Under Siege: Why Purism’s User Sovereignty Model is the Way Forward
- Code is Power!
- Dialing Back to Move Forward: Why the Landline Revival Signals a Future for Privacy
- Google’s New Sideloading Restrictions: Why Purism Thinks Differently
- Introducing the Librem PQC Comms Server

