
Voice over IP in GNOME Calls Part 1: SIP Protocol and Libraries
Latest posts by Evangelos Ribeiro Tzaras (see all)
- FOSDEM 2023 Event Report - February 27, 2023
- FOSDEM 2023 coming up in Brussels - February 3, 2023
- Voice over IP in GNOME Calls Part 2: The Implementation - July 13, 2022
GNOME Calls has supported Voice over IP (VoIP) calls for some time. And while we already mentioned it in our development review of 2021 and design review of 2021 we wanted to take this opportunity to dive a bit more into the technical aspects of how all the gears interlock to make it work in Calls.
This blog post will take you through our journey of implementing encrypted VoIP Calls and shed some light on the inner workings of it all.
Before we start
To the uninitiated in the dark arts of Voice over IP we want to apologize in advance for the acronym soup you are (unless you stop reading here) inevitably about to enter.
We will give our best to keep it simple and only focus on the essentials, i.e. terminal output, code and SIP messages will be shortened for brevity and simplicity’s sake.
The core protocols: Session Initiation Protocol
The Session Initiation Protocol (SIP) is used as the signalling protocol for initiating (as the name suggests), maintaing and terminating to communication sessions between multiple peers.
It is a text based protocol for client-server interactions similar in design to the Hypertext Transfer Protocol and it even shares some status codes, notably things like 200 OK and 404 Not found.
To give an overview of how a call is made we refer to the SIP trapezoid illustrated below. It shows two peers that want to communicate with each other (SIP Client A and B):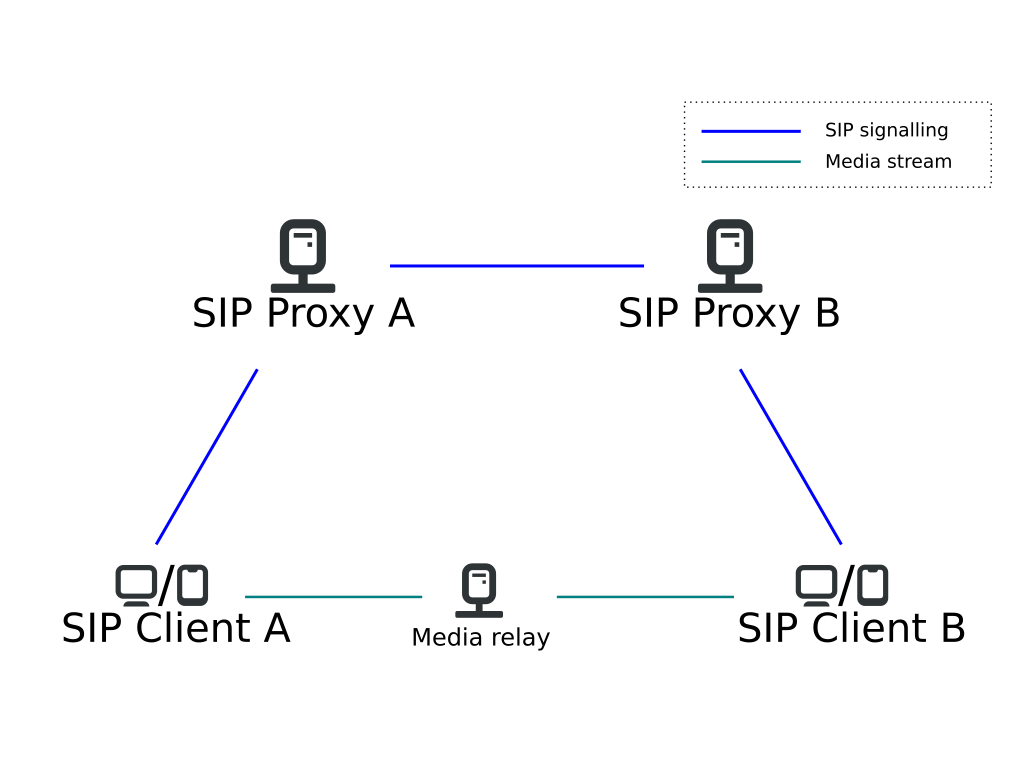 Generally the clients would live in different domains (called here domain
 A and B) and each of them only talks to a proxy server responsible for their domain (so e.g. Client A talks directly to Proxy A). These proxy servers are tasked with relaying SIP messages between domains and finally to the client.
The key take-away is that signalling and real time media are carried over separate connections (e.g. using UDP).
The real-time data (e.g. audio) is transported using a separate connection independent of the SIP signalling using the RTP protocol (see below).
This could be a direct connection between Client A and Client B It could also be using a media relay (an optional server that proxies or remixes the media) to make connection establishment easier for users behind a NAT or when your ISP provides a gateway that feeds into the public switched telephony network (PSTN).
Let us now take a look at the INVITE transaction which is used to establish a session. In our example alice@wonderland.org is trying to call bob@baumeister.com:
  INVITE sip:bob@baumeister.com SIP/2.0
  Via: SIP/2.0/UDP wonderland.org;branch=z9hG4bK776asdhds
  Max-Forwards: 70
  To: Bob <sip:bob@builders.com>
  From: Alice <sip:alice@wonderland.org>;tag=1928301774
  Call-ID: a84b4c76e66710@wonderland.org
  CSeq: 314159 INVITE
  Contact: <sip:alice@wonderland.org>
  Content-Type: application/sdp
  Content-Length: 142
For our examination here the important parts are the From and To header fields, which specify (you guessed it) where the call is coming from and who the intended recipient is. We have omitted the body of the SIP message here in order to focus on the essentials of how the session is initiated and not bother too much about the session description which concerns itself with what type of media is exchanged and how to establish the media session connections.
Assuming Bob wants to take the call he will sent a 200 OK back to Alice:
  SIP/2.0 200 OK
  Via: SIP/2.0/UDP sip-server.baumeister.com
     ;branch=z9hG4bKnashds8;received=192.0.2.3
  Via: SIP/2.0/UDP wonderland.org
     ;branch=z9hG4bK776asdhds ;received=192.0.2.1
  To: Bob <sip:bob@baumeister.com>;tag=a6c85cf
  From: Alice <sip:alice@wonderland.org>;tag=1928301774
  Call-ID: a84b4c76e66710@wonderland.org
  CSeq: 314159 INVITE
  Contact: <sip:bob@192.0.2.4>
  Content-Type: application/sdp
  Content-Length: 131
The discerning reader will have noticed the presence of the Via header fields. They are actually present in the initial INVITE as seen by Bob because SIP proxies involved in routing insert this field for each hop in the request. Responses are then routed in the opposite direction eliminating each Via as it passes the respective proxy server.
Apart from the INVITE method we also want to briefly mention the REGISTER method. REGISTER is used to authenticate to a server and indicate that a device is “online”. Note that usually you can log into an account from multiple devices.
If you want to learn more about the purpose of REGISTER have a look here.
Session Description Protocol
The Session Description protocol (SDP) describes what type of media session should be established.
It carries information about audio codecs or video codecs you want to use and under which address you are prepared to receive data sent to you over an IP network, such as the internet or your local network.
Now direct your attention to the following SDP message:
     v=0
     o=alice 3724394400 3724394405 IN IP4 198.51.100.1
     s=Call to Bob
     c=IN IP4 198.51.100.1
     t=0 0
     m=audio 49170 RTP/AVP 0
For our intents and purposes the c= and m= lines are the most interesting: They tell us the IP address (197.51.100.1) and port (49170) that is supposed to carry audio. RTP/AVP specifies that we do not use encryption and the payload type 0 indicates that we want to use the PCMU codec (Pulse-code modulation using the mu-law algorithm).
SDP is usually used in an offer/answer mode of operation to negotiate session parameters like the codecs used: The offerer presents a number of different audio codecs and in the answer they are narrowed down to a single negotiated codec (per media component, e.g. separate audio and video).
A call will not be established if negotiating capabilities (e.g. codecs) fails.
Real Time Protocol
The Real Time Protocol (RTP) is a transport protocol for real time data like audio or video media.
In the SIP trapezoid it is represented as the “media stream”.
For RTP there are different profiles, such as the “Profile for Audio and Video Conferences with Minimal Control” (this is the AVP in the SDP example message above) that define a set of payload formats identified by a number (between 0 and 127) which the specification maps to different media formats like opus or VP8.
For completeness sake we want to mention the companion RTP control protocol (RTCP) which is used to monitor the quality of service and e.g. issue retransmission of audio packets.
GStreamer
GStreamer is a media framework for constructing graphs of media-handling components.
The graph (also called a pipeline) consists of nodes (also called elements) and the connections (edges) between them which describe how data flows from producers to consumers.
Each GstElement has one or more pads which come in two types: source pads (produces/sources data) and sink pads (consumes/sinks data).
We can broadly classify the the types of elements as Broadly speaking elements interact with data in one of the following ways:
- producing (output), e.g.
alsasrcfor your microphone - consuming (input), e.g.
udpsinkto send data over the network to a remote host - processing/transforming (input and output), e.g. resample audio
You can even plot pipeline graphs.
Visually inspecting the graph can help spotting unlinked pads or diagnose incorrect property values set for the elements.
Functionality like
- capturing audio from your microphone
- recording videos with your camera
- encoding and decoding (codec) audio and video
- streaming media to and from the network
is provided by the vast plugin ecosystem allowing developers to include all sorts of media in their applications.
In our case we want to record audio from a microphone, encode the audio stream and insert it into RTP packets to be sent over the network to a remote host as well as receiving audio from a remote host and playing it back to the user.
With the handy gst-launch-1.0 tool you can construct a pipeline from the convenience of your terminal to play around with it.
In the following some simple examples are shown: You will see command invocation as well as a visual representation of the resulting pipeline graph.
Let us start by capturing some raw uncompressed audio from the microphone and saving it to a file.
$ gst-launch-1.0 alsasrc ! filesink location="gst_record.wav"
And the corresponding pipeline graph shows how the alsasrc is linked to filesink. Each block represents one pipeline element and each edge represents a link between the pads of two elements. These pads are either source pads which produce data or sink pads which consume data.
 So now that we have recorded some audio, we’d like to play it back of course. You can accomplish this with the following command:
$ gst-launch-1.0 filesrc location="gst_record.wav" ! audio/x-raw,format=S16LE,layout=interleaved,rate=44100,channels=2 ! audioconvert ! alsasink
Wait a moment, where is all that scary looking stuff between filesrc and alsaink coming from and why do we need it? In order to understand what has happened so far, let us examine the file that we’ve recorded.
$ mpv gst_record.wav
Failed to recognize file format.

Exiting... (Errors when loading file)
So since the recorded file does not include any metadata about how the data is structured we cannot play it with mpv or similar media players because they simply don’t know how to interpret the data.
$ file gst_record.wav
gst_record.wav: data
So it’s data! How very helpful my dear computer!
The “audio/x-raw,…” bit specifies the capabilities, so the latter parts of the pipeline know what type of data they are being fed.
So now that we know what that scary incantation was all about, we leave it as an excercise to the reader to add -v to the first gst-launch-1.0 command invocation and see the magic unfold. Let us conclude with a few more examples just to see what can be done, like sending audio over the network
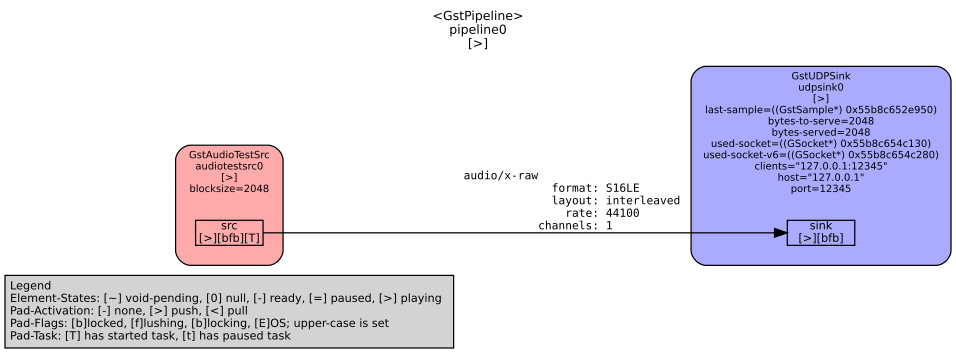
$ gst-launch-1.0 -v audiotestsrc ! udpsink port=12345 host="127.0.0.1"
 and throwing it directly into the garbage bin
$ gst-launch-1.0 udpsrc address="0.0.0.0" port=12345 ! fakesink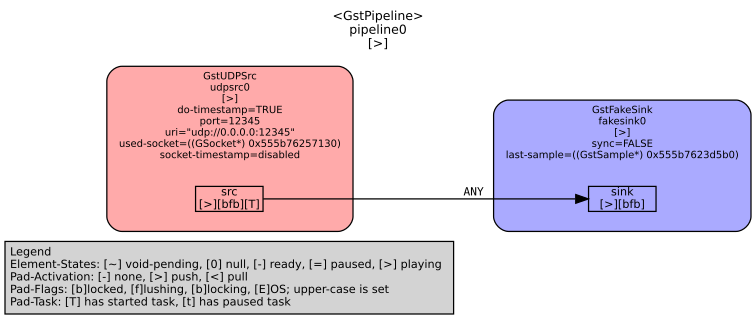 or playing back a flac encoded audio file.
 $ gst-launch-1.0 filesrc location="02 Mars For The Rich.flac" ! flacparse ! flacdec ! audioconvert ! audioresample ! pulsesink If you’re not yet satisfied and crave even more pipelines: Fear not, more pipelines await you below.
And if you really cannot wait (we wouldn’t blame you), feel free to check out some of the
where some C code awaits.
Sofia-SIP
Sofia-SIP is a SIP User-Agent library originally developed by Nokia, which uses the reactor pattern. This event driven nature (and specifically the libsofia-sip-glib companion library) makes it very easy to integrate into GLib based applications like GNOME Calls.
In terms of usage you basically register a callback with the nua_create() function. Events (nua_event_t) like a new incoming call (nua_i_invite) or a response to an outgoing call (nua_r_invite) trigger invocations of your callback function, allowing to process them and take appropriate actions.
But let’s take it one step at a time. First we want to initialize a “root” and create a GSource, which we can attach to our GMainLoop:
su_root_t *root = su_glib_root_create (magic);
GSource *source = su_glib_root_gsource (root);
g_source_attach (source, NULL);
With this initialization done, we can now create the user agent and register the callback:
nua_t *user_agent = nua_create (root, callback, magic, ...);
The magic is a pointer that will be passed around to the callback you registered before. You can think of it in terms of a gpointer user_data in GLib parlance and it is one of the arguments the callback will get passed.
To give you an idea of how such a callback looks like let’s have a look at the example from the documentation.
void app_callback(nua_event_t   event,
                  int           status,
                  char const   *phrase,
                  nua_t        *nua,
                  nua_magic_t  *magic,
                  nua_handle_t *nh,
                  nua_hmagic_t *hmagic,
                  sip_t const  *sip,
                  tagi_t        tags[])
{
  switch (event) {
  case nua_i_invite:
    app_i_invite(status, phrase, nua, magic, nh, hmagic, sip, tags);
    break;

  case nua_r_invite:
    app_r_invite(status, phrase, nua, magic, nh, hmagic, sip, tags);
    break;

  /* and so on ... */

  default:
    /* unknown event -> print out error message */
    if (status > 100) {
      printf("unknown event %d: %03d %s\n",
             event,
             status,
             phrase);
    }
    else {
      printf("unknown event %d\n", event);
    }
    tl_print(stdout, "", tags);
    break;
  }
}
If you’re curious, have a look at the callback in Calls.
Proof of Concept
Now that we know how to use Sofia-SIP for the signalling and GStreamer for media streaming it’s time to combine them and in doing so conclude the proof of concept stage.
Bask in the glory of this toy implementation!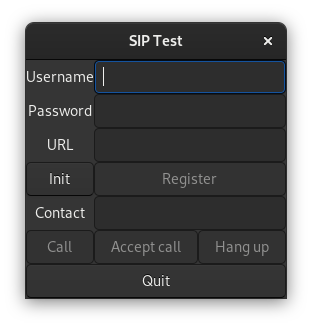 Of course at this stage there were quite a few limitations hardcoded, but it did allow establishing voice calls on the local network between two peers, i.e. without a SIP server.
Developing a minimal implementations outside of calls codebase proved very useful to learn GStreamer and sofia-sip free of the constrains imposed by Calls because of its plugin architecture and abstractions.
Summary
We learned a bit about how VoIP calls work with SIP (initating a session with INVITE), SDP (negotiating session parameters like used audio format) and RTP (real time data, e.g. audio stream). We have seen that the signalling plane (SIP/SDP) and media plane (RTP) use separate IP connections. We concluded with libraries you might pick in a VoIP client and used them for a self contained minimal proof of concept implementation. Stay tuned for the next blog post to learn details about the SIP implementation for GNOME Calls!
Purism Products and Availability Chart
| Model | Status | Lead Time | ||
|---|---|---|---|---|
 | Librem Key (Made in USA) | In Stock ($59+) | 10 business days | |
 | Liberty Phone (Made in USA Electronics) | Available on backorder ($1,999+) 4GB/128GB | n/a | |
| Librem 5 | In Stock ($799+) 3GB/32GB | 10 business days | |
 | Librem 11 | Out of stock | New Version in Development | |
 | Librem 14 | Out of stock | New Version in Development | |
 | Librem Mini | Out of stock | New Version in Development | |
 | Librem Server | In Stock ($2,999+) | 45 business days | |
 | Librem PQC Encryptor | Available Now, contact sales@puri.sm | 90 business days | |
 | Librem PQC Comms Server | Available Now, contact sales@puri.sm | 90 business days |
Recent Posts
Related Content
- Purism Announces Launch of Its Librem 16 Laptop, the World’s Most Private and Secure Workstation
- Google’s Lock Down Policy
- Smartphone Study
- DHS Inspector General Study
- Privacy Under Siege: Why Purism’s User Sovereignty Model is the Way Forward

